This is a fun little project I started over the summer in order to attempt to apply some dynamic recompilation techniques to a commercial piece of hardware.
| Legend of Zelda | Tetris |
|---|---|
 |  |
To delve into the specifics of dynamic recompilation, we first need to have an emulator. This post will detail how an emulator operates, and the following will get into the specifics of a dynamic recompiler. Let’s go!
What is “emulation”?
Emulation involves running a guest system on a host system. Here, the guest system is the original Nintendo Gameboy, and the host system is my (or your) laptop.
he Gameboy’s architecture differs significantly from modern hardware.
Its Sharp LR35902 CPU is based on the Zilog Z80 ISA,
unlike the x86 ISA of most current CPUs.
The custom Pixel Processing Unit (PPU) further sets it apart
as completely distant from current gen GPUs.
So, how do we play Gameboy games on modern hardware?
The answer: emulation.
By recreating the Gameboy’s hardware and internal state through software,
we can trick games into thinking they’re on authentic hardware when executed.
To begin the process, we start with the foundational element in computer science: memory.
The Gameboy’s memory map
First, let’s have a look at how the 16 bit memory bus of the Gameboy is structured (courtesy of pandocs):
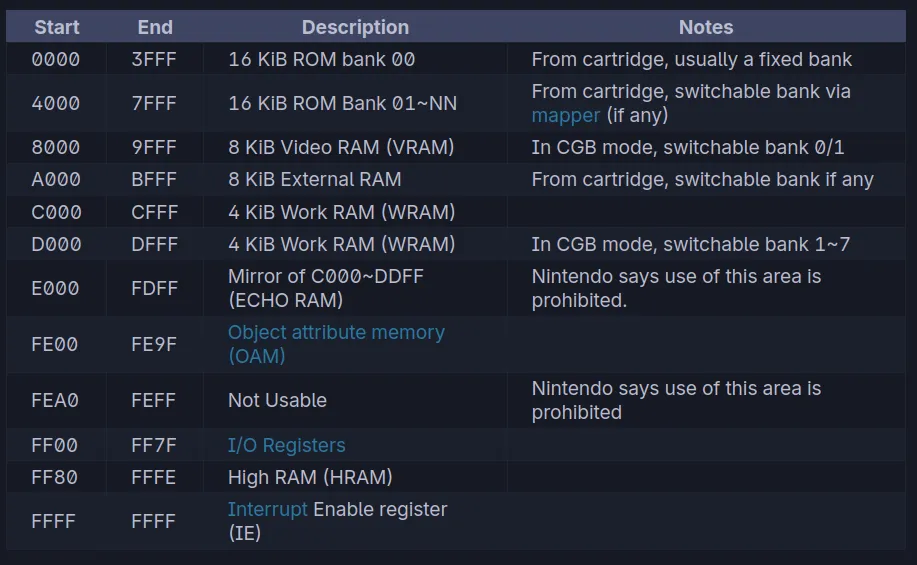
From here we can see that the game’s ROM is mapped from 0x0000 to 0x7FFF. Great! Let’s load the game’s rom into this region and start executing instructions.
Executing instructions, an interpreter
The Gameboy’s CPU starts with a program counter at 0x0000 and features a stack pointer, along with registers AF, BC, DE, and HL. Gameboy instructions, variable in length, can be decoded using this opcode table.
Let’s take an example: opcode 0x04 translates to INC B. The instruction reference tells us how to recreate this instruction in software, so let’s look at how recompiler boy does it
int GBInterpreter::inc_r8(Core& core, uint8_t r8) {
  // Decode which register is being incremented
  auto& src = get_r8(core, r8);

  // Set half carry flag
  core.set_flag(Regs::H, (src & 0xf) == 0xf);

  // Perform the opcode operation: increment the register
  src++;

  // Set zero flag
  core.set_flag(Regs::Z, src == 0);

  // Set negative flag to 0 unconditionally
  core.set_flag(Regs::N, false);

  return 0;
}
From this short example we can learn a lot of things:
-
> Every instruction can possibly modify one of four flags (ZNHC)
-
> Instructions can possibly encode which register they modify through the opcode itself
 From this
we can see that bits 3-5 select the register from an
opcode grouping here:
From this
we can see that bits 3-5 select the register from an
opcode grouping here:
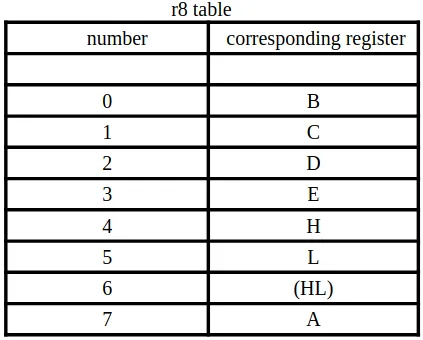 Since 0x04 has the bits 3-5 set to 0, it selects the
B register!
Since 0x04 has the bits 3-5 set to 0, it selects the
B register!
Phew, that’s one instruction implemented. Only 511 more to go. While this approach works (and is aptly called an interpreter), it’s very slow. The dynamic recompiler in the next post aims to address that.
The Pixel Processing Unit
The PPU of the Gameboy is a custom scanline renderer that reads a tilemap, which indexes into tiledata.
Interrupts, timing, and putting it all together
Once we implement the cpu using an interpreter and the ppu, we can start booting some basic games and seeing some visual output.
However, if we want to actually play games, then we have to implement interrupts and correct timing of components in order to have everything work nicely together.
Future topics, and other readings
The project’s future posts will delve into JIT compilation to optimize the emulator further. The focus will be on enhancing performance and accuracy for a wide range of Gameboy games.
Other blogs for further readings: